
Jewellery
Making Tools
for Beginners
Everything you need to know before you buy your first set of pliers — from Australia's original online bead store, trusted by over 80,000 makers since 1998.
Starting out in jewellery making is one of the most rewarding creative journeys you can take — but with so many tools on the market, it's easy to feel overwhelmed before you begin.
This guide draws on over 25 years of experience supplying Australian jewellery makers — from complete beginners to professional designers. We'll walk you through exactly which tools to buy first, which to save for later, and how to avoid the common mistakes that cost beginners time and money. Every tool listed is either available in our Melbourne-stocked store or can be requested directly.
Years serving
Australian makers
Est. 1998 · 80,000+ customers
The Essential Three
Every beginner needs these before anything else
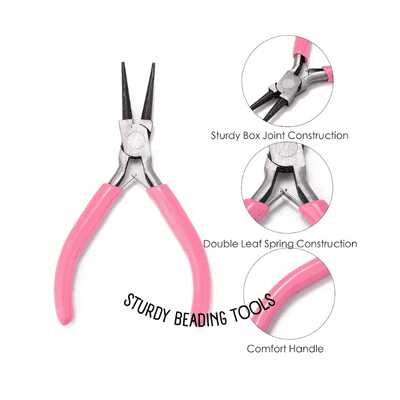
The most-used tool in any jeweller's kit. Round-nose pliers have tapered, conical jaws that let you create smooth, consistent loops in wire — essential for making ear wires, connecting links, wrapped loops, and attaching charms. Without these, wire work is nearly impossible.
A sharp pair of flush wire cutters makes clean, flat cuts close to the wire — leaving no rough "pinch" that could scratch the wearer. These work with beading wire (tigertail), head pins, eye pins, and most standard jewellery wires. Do not use standard flush cutters on memory wire, which requires its own heavy-duty cutter.
Crimping pliers are used to secure crimp beads and crimp tubes onto beading wire — finishing your necklaces and bracelets with a neat, professional clasp connection. They have two channels: one to fold the crimp into a C-shape, and one to round it back into a neat cylinder. Far superior to simply squashing crimps flat with regular pliers.
Highly Recommended Next Steps
Expand your toolkit as your skills and projects grow
Flat-nose pliers have smooth, flat jaws perfect for gripping wire, opening and closing jump rings, and bending sharp 90° angles. They are the ideal "second plier" — hold your work steady with flat-nose in one hand while manipulating with round-nose in the other.
Chain-nose pliers taper to a fine, flat point — ideal for reaching into tight spaces, gripping small jump rings, and working with fine chain. They're the workhorse of precision jewellery work. Many intermediate makers find themselves using chain-nose more than any other plier.
A non-slip bead mat might not look exciting, but it prevents beads rolling away and lets you lay out your design before stringing — saving you from constantly chasing runaway seed beads across your desk. The textured surface grips beads so they stay exactly where you put them.
If you're working with seed beads, peyote stitch, or any loom beading, a quality beading needle is non-negotiable. Beading needles are finer and more flexible than standard sewing needles, able to pass through the tiny holes in seed beads multiple times without bending or breaking the bead.
Specialist Tools — Level Up
Tools that open up whole new jewellery-making techniques
Memory wire is hardened steel wire that holds its coiled shape — making beautiful stacking bracelets and necklaces with no clasps needed. However, this hardness will destroy regular flush cutters instantly. Heavy-duty memory wire cutters (end-nippers or heavy-duty diagonal cutters) are specifically designed for this job.
The 1-Step Looper by Beadsmith is a game-changing tool that simultaneously bends and cuts wire to create perfectly consistent simple loops on head pins and eye pins — in a single squeeze. Ideal for making earrings at scale or for anyone who struggles to make neat loops by hand.
Traditional knotted pearl necklaces use a knot between each bead to protect them and create beautiful drape. A knotting tool or fine awl helps you position each knot precisely against the bead before tightening — a technique that's nearly impossible to do neatly with fingers alone.
The Thread Zap is a battery-powered pen tool with a heated metal tip that melts and seals synthetic thread ends cleanly — perfect for finishing kumihimo braids, macramé, and any project where you want a clean, melt-sealed end rather than a knot. A favourite for Fireline and other synthetic beading threads.
Which tools do you need
for your style?
Different jewellery-making styles call for different tool combinations. Here's a quick guide to what you'll need based on what you want to make.
Bead Stringing
The most beginner-friendly technique — threading beads onto wire or cord and finishing with a clasp. Clean, satisfying, and endlessly creative.
Wire Wrapping
Using wire to create ornamental wraps, cages, and bezels around stones or beads. A hugely popular technique with a beautiful organic aesthetic.
Earring Making
Making ear wires and dangle earrings requires consistent loops for a professional result. A classic beginner project that creates an instant wearable result.
Seed Bead Stitching
Peyote, herringbone, right-angle weave — stitch-based beadwork creates intricate textile-like jewellery using tiny seed beads and beading thread.
Pearl Knotting
The traditional art of knotting between each pearl creates heirloom-quality necklaces with beautiful movement and protection for precious beads.
Memory Wire Jewellery
Beading onto pre-coiled memory wire creates instant stacking bracelets and necklaces that hold their shape — no clasp needed and very beginner-friendly.